Weather station - Containerization and hosting
Table of Contents
Weather station - This article is part of a series.
Now, with the measuring station up and running, the backend storing and fetching data, it’s time to dockerize stuff! This blog post will explore the benefits of Docker and how it can help us create independent and deployable services.
Yeah, but why? #
This is a question which I asked myself when I learned about Docker’s existence. This virtualization and “spinning containers” things seemed odd and redundant to me, but mostly because the majority of my experience was with embedded systems and some scripting. Nowadays, if the place and time is right, I try to dockerize everything that makes sense to do so and create independent, lightweight, and deployable services.
Some nice things that I experienced with Docker:
- Sandboxed environment - Effectively allows to experiment and test things out without affecting the stability of the host environment
- Reproducibility - Once you have the image set-up, every time you start a container, it will always be the same, no surprises
- Networking - Docker allows for containers to communicate with each other inside its networking system and connect them even with non-Docker (host) workloads
- Storage - Want to manage or migrate the data from your database? No problems, Docker volumes will do the trick
- Orchestration - Run or remove Docker containers on the fly based on your current workload and needs
The list of handy features is quite extensive, but the above points is something that I find most useful during development and deployment. Also, one additional thing for which Docker is famous for, and it’s used a lot in complex software systems, is the microservice software architecture style.
There are alternatives like Podman which will do also the trick, but Docker will be in the focus od this project.
Components overview and relations #
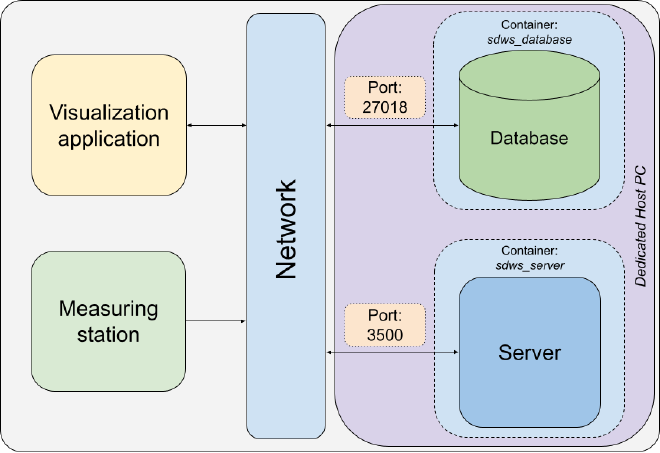
In order to get a better grasp on how things are connected with each other, the following picture shows an overview of all components in the project.

By looking at the picture, a classic architectural pattern emerges - client-server aka the three-tier architecture. The components are organized into the following tiers:
- Presentation tier - data visualization application
- Application tier - server, measuring station(?)
- Data tier - database
I put a question mark besides the measuring station as, by definition of the application tier, it collects and processes the information from the presentation tier and sends it to the database. As the measuring station is collecting, processing, sending data to the server, and, ultimately, storing it into the database via the server, I assigned it to the application tier, but this is a topic of discussion on its own.
The server and database can be services by itself, so I decided to dockerize them for now. The data visualization is currently available as a desktop application but could be also dockerized once the application is built with the Wasm binary which would convert the desktop into a web application, but more on that in a follow-up post.
Docker files #
In order to achieve the previously mentioned dockerization, docker files need to be implemented. In this situation, one docker file for the server, and a docker compose file to run all defined services (containers), which are the server and database.
The server docker file looks like the following:
# Image
FROM golang:1.20.1

# Define the work directory on the host
WORKDIR ./server

# Copy the host project folders into the container's working directory
COPY ./server .

# Create/update the go.sum file
RUN go mod tidy

# Build the server binary
RUN go build -o server .

# Give executable privileges to the `server` binary
RUN chmod +x server

# Run the backend server
CMD [ "./server" ]
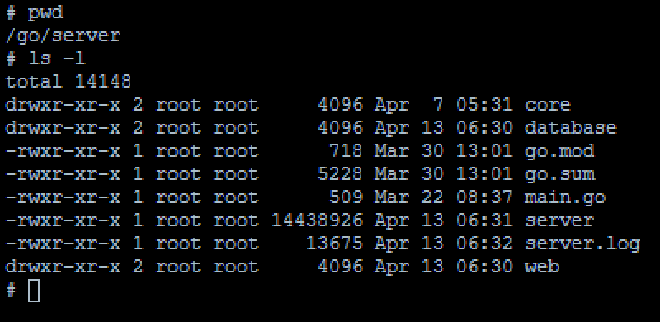
In simple terms, it’s just defining steps what needs to be done in order to run the server executable. One thing to mention here is that Docker offers images on it’s hub with ready-to-use containers. In this case, I use the Golang image as the base image, which is running a Ubuntu 22.04 OS with a preinstalled Golang environment, and will include the copied server files into the image itself which looks like the following:

In order to run the whole system at once, docker-compose comes to the rescue. To achieve this, a docker-compose.yml file is created which defines all needed services, volumes and network parameters. One example of a database service looks like the following:
services:

    # Service name
    database:

        # Image name which will be pulled from the Docker hub
        image: mongo

        # Name of the container which will be assigned once run
        container_name: sdws_database

        # Restart policy in case of an exit
        # Example - The server is depending on the database service which has not started yet.
        #           The server will restart until the database service is ready for usage.
        restart: always

        # Port exposure - maps the port 27018 to 27017 (default MongoDb port)
        ports:
            - "27018:27017"

        # Contains sensitive information, i.e. database login credentials
        env_file: .env

        # Database data
        volumes:

            # Where the database will store the data
            - database_data:/data/db

            # MongoDB initialization script
            - ./server/database/mongo-init.js:/docker-entrypoint-initdb.d/mongo-init.js:ro

        # Allow containers and host to communicate with each other
        networks:
            - network
Once the services, volumes and networks are properly defined, they be run by executing the following command:
docker-compose up -d --build
This will run all services in detached mode and will build the images before the starting the images in case there are any new changes.
Dedicated host #
To make this work as standalone services, one approach was to create a dedicated server which, in my case, is an old laptop with Ubuntu Server 22.04.2 running as it has all needed networking functionalities for the server. One important thing to install is Docker, which will be sufficient to run the server. Also, make sure you enable ssh so you can connect from any device within your local network to the server.
After everything is installed properly and the above mentioned docker-compose command is executed, the containers will be only visible within the host machine (localhost) and is not visible on our local network which means that the measuring station will not be able to send request with weather data to the server. To circumvent this situation, enable data traffic via
port 3500 inside the host’s firewall - more about on opening ports that can be seen
here.
Once traffic on the port 3500 is enabled, the IP address of the dedicated server must be obtained. One approach is to type in the command ifconfigon the server and search the interface over which you’re connected to your local network - in my case it was the ethernet interface. More about that can be found
here. Another approach is to open up your router management site and look for the connected devices list which should contain the IP address of the server.
Once all this is set, the server should accept incoming requests via the browser (or any network communication and data transfer tool) and can be pinged. Let’s assume that the device address is set to 192.168.1.42, and we know that the communication is taking place via port 3500, just enter the following address into the browser:
http://192.168.1.42:3500/ping
An "OK" response should be returned, and with that kind of response the verification process is completed and start to use the server by adding and fetching weather data from the server.
Conclusion #
This post covers all about the dockerization process and allowing the server to communicate over the local network with the measuring station. The next blog post will cover the visualization process of the measured data which is as a desktop application written in Rust.
Stay tuned and thanks for reading!
P.S. Link to the project: https://github.com/zpervan/SuperDuperWeatherStation