Weather station - It's alive!
Table of Contents
Weather station - This article is part of a series.
As spring is now here, it was time for a new side project. For a long period of time, I wanted to build a small weather station where the data was stored, somewhere, on my local network. The server technology decision was based on something that I have started to learn in recent times and, therefore, wanted to explore it even more.
The project itself is (currently) made of two parts:
- Measuring station - Consists of a microcontroller with and integrated Wi-Fi module, and a sensor for measuring temperature and humidity data
- Server - Receives the microcontroller weather data and serves it to all connected clients
In some point of time in the future, I plan to add some kind data visualization in the form of a desktop or web application, but for now, let’s take the first step by making the backend work properly. This post will focus on how to connect the measuring station itself and show a minimum working code example.
You can find the full working code example at the end of the post.
The hardware #
The measuring station consists of three major components:
- ESP01 microcontroller with a built-in Wi-Fi module
- DHT22 temperature and humidity sensor
- Power supply
Both, the microcontroller and sensor, work on 3.3VDC so there are multiple options to provide the needed power. I chose to use the YwRobot 545043 power supply module during the development process for two reasons:
- Provides a stable 3.3VDC with a maximum of 700mA at the output which is more than sufficient
- Header pins which can snug easily into any larger development board so no additional wiring is needed
There are alternatives for making a power supply, like creating a voltage divider or use a voltage regulator like AMS1117 which would be a better option if we wanted to make a small PCB, but this decision is for a later stage of the project as I want to keep it simple and without any need for additional components or designs.
Connection schema #
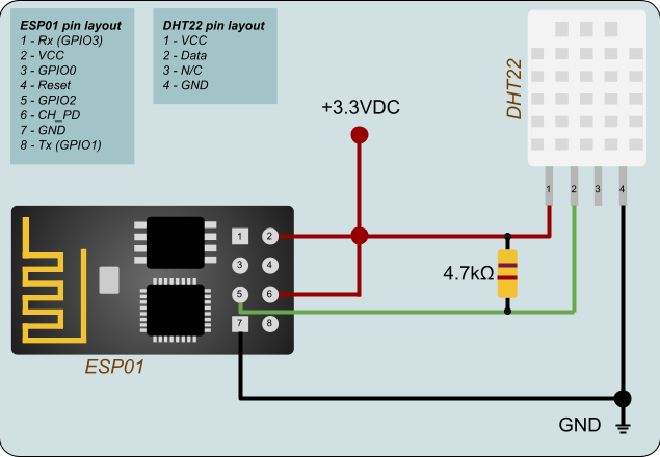
The wiring diagram is really simple, as you can see in the picture below.

Besides the above-mentioned components, there is a
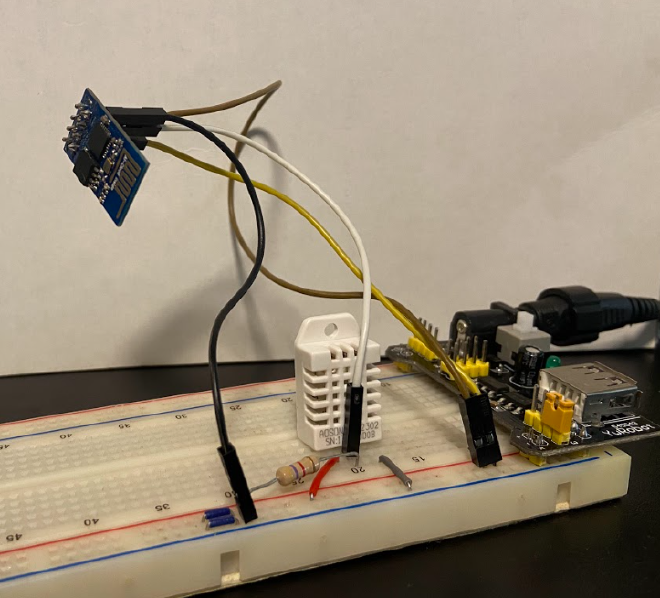
pullup resistor which is used to have a stable signal voltage value while the ESP01 and DHT22 are exchanging data. When all components are connected together, we get the following:

Bringing the hardware to life #
The proposed software solution is pretty straightforward, which means it’s all out-of-the-box solutions. First of all, make sure you have installed the Arduino IDE and added the ESP8266 package. More information on how to setup the Arduino IDE can be seen here.
To upload the code to the ESP01 module, I used the Open-Smart USB to ESP01 Adapter which makes the upload process super simple, and you can switch between programming and USB mode which comes handy while debugging or monitoring activities on the ESP01 via serial monitor. One caveat of the USB specified adapter is that you cannot (at least without any modification) hook up any external devices (i.e., sensor) so the debugging or monitoring process can be cumbersome.
There are other alternatives of uploading the code to ESP01 like with an Arduino board, but it tends to be messy and error prone, so I suggest USB adapter approach.
Let’s connect #
In order to connect to your local Wi-Fi network, the following libraries are needed:
#include <ESP8266WiFi.h>
#include <ESP8266WiFiMulti.h>
#include <ESP8266HTTPClient.h>
Those libraries will allow the ESP01 to connect and communicate with the server over the local network. The setup code looks like the following:
/* Environment variables */
#define SSID     "YourNetwork"
#define PASSWORD "NetworkPassword123"

/* Globals */
ESP8266WiFiMulti wifi_multi;

void setup()
{
    // Set the ESP01 into "STATION" mode
    WiFi.mode(WIFI_STA);

    // Add the Wi-Fi connection data
    wifi_multi.addAP(SSID, PASSWORD);

    // Try to connect
    wl_status_t status = wifi_multi.run();

    if(status != WL_CONNECTED)
    {
        // Error handling code...
    }
}

void loop()
{
    // Server communication and sensor measuring code
}
One common error, which I also made, was the wrong SSID and PASSWORD of the network, so make sure everything is correct. If the setup was successful, HTTP requests can be sent to the server which means we can send the actual weather data. The HTTP request and response part will be covered in a follow up post of the weather station series.
What’s the weather outside? #
DHT sensors are, by now, one of the most used sensors in starter or home projects, and therefore have a simple and straightforward code integration with multiple microcontrollers. Make sure you have installed the DHT library in your Arduino IDE by going to Sketch > Include Library > Manage Libraries and search for the DHT sensor library from Adafruit.
Once installed, the setup code looks like the following:
/* Libraries */
#include <DHT.h>

/* Sensor configuration variables*/
#define DHT_PIN  2 // The data pin is connected to the ESP01 GPIO2 pin
#define DHT_TYPE DHT22

/* Globals */
DHT dht(DHT_PIN, DHT_TYPE);

void setup()
{
    // Start the sensor communication
    dht.begin();
}

void loop()
{
    // Let's give the little fella some breathing room
    delay(1000);

    float temperature = dht.readTemperature();
    float humidity = dht.readHumidity();

    // Wi-Fi and POST request code
}
And this is the minimum working code example which allows ESP01 to request data from DHT22.
Upload #
After the code is added and the compilation process is successful, the upload process can start. Make sure that the proper board (Generic ESP8266 Module) and communication port are selected, hit the upload button and wait for the upload process to finish.
Conclusion #
This post covers the wiring and sensor data acquisition part which is the essential part for our weather station in order to obtain any environmental data. In the next posts, I will write about the server (design decisions and the code), dockerize the server environment, how to make HTTP requests with ESP01 and store the sensor data into a database.
If you’re interested how the full working example looks like, you can have a look here.
Stay tuned and thanks for reading!